Catalog › Installation Guide: Solstice/Sky N/A Axle Back Kit Installation Guide: Solstice/Sky N/A Axle Back Kit
Warnings and Safety Measures
• Allow the vehicle’s exhaust system to cool before removal. Exhaust system temperatures may cause severe burns.
• If working without a lift, always consult vehicle manual for correct lifting specifications.
• Always wear safety glasses and ensure safe work area.
• Catalytic converter are to be used for off road use only.
• Professional installation is recommended.
Removing the Stock Exhaust System
1. Cut the stock exhaust pipe in the appropriate place per the three different measurements to assure that you cut at the right spot.
A) Seam of the muffler to pipe – 15 ¾“
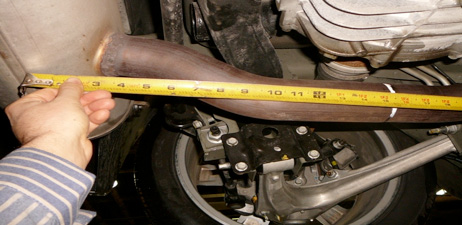
B) Rear bend to cut line – 5”
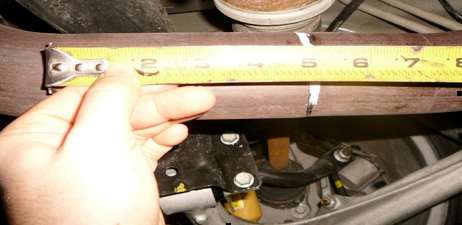
C) Cut line to front bend – 3”
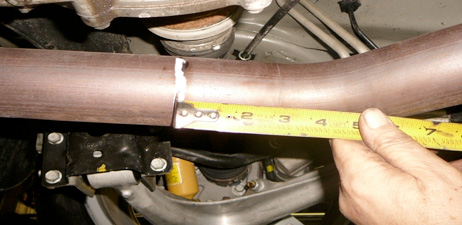
2. Sawzall the cut line.
3. Pull down on rear of the exhaust system by the muffler. When the 4 rubber hangers stretch, squirt soapy water into the rubber where the hangers go. You could use WD40 or grease but that would not be to good for the rubbers. It will starts to deteriorate them.
Using a fair size channel lock pliers, squeeze the backside of the rubber and the hanger rod. This will push the hanger knob into the rubber. Start all 4 like this. Then using a long screw driver or pry-bar take off the two front hangers (the two closest to the engine). The two rear ones are still in and will support the system while prying. From here you can actually pull the system out of the rear two hangers or pry them out.
Installing Your New Exhaust Kit
Note: Put everything up and in place loosely and align properly before tightening.
1. Slip Solo pipe over stock exhaust pipe and insert rod hangers into the two rubber hangers.
2. Install Solo Muffler with the center port as the inlet and the offset port as the outlet.
3. Install the muffler on a 45° angle as the picture shows.
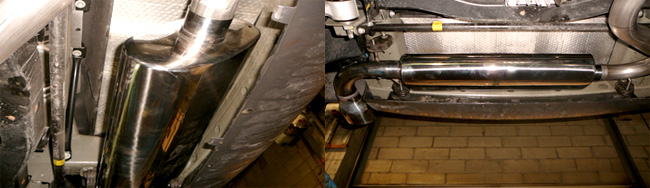
4. Install the tail section.
5. Align all pieces and run your hand along the top-back side of the muffler to make sure you have at least ¾” clearance from everything.
6. Center and level your stainless steel exhaust tip.
7. Have someone hold your tip centered and level while you do your final tighten.
Final Tightening
1. Align everything to a suitable level before you tighten. There is a lot of “wiggle room” in this alignment.
2. When all looks good snug the three connections with your 9/16” socket.
3. If all still looks good do your final tighten from the front to the rear.
4. Drive away and… Enjoy Going Solo!
Back to TopFor any questions or concerns, please do not hesitate to call:
Jeff at (716) 544-2468 or (905)703-1557
Mufflerman (Buffalo NY) at (716) 873-0440
Zoro Muffler Mississauga Shop at (905) 897-6833