Catalog › Installation Guide: Camaro Convertible Axle Back with J-Pipes Installation Guide: Camaro Convertible Axle Back with J-Pipes
Extreme caution must be taken to ensure proper alignment of the exhaust tips. Do not tighten any of the band clamps until everything is in place and the tips are aligned perfectly.
Warnings and Safety Measures
• Allow the vehicle’s exhaust system to cool before removal. Exhaust system temperatures may cause severe burns.
• If working without a lift, always consult vehicle manual for correct lifting specifications.
• Always wear safety glasses and ensure safe work area.
• Catalytic converter are to be used for off road use only.
• Professional installation is recommended.
Removing the Stock Mufflers (Rear braces should be removed)
Note: Rear Braces
Taking off the rear braces (drivers and passenger side) makes the stock exhaust disassembly and install much easier. The rear braces consist of 3 bolts and one nut (all 15MM) per side. Re-install the braces once the Solo Axle-Back exhaust kit is fully installed.
1. The “cut points” for the V8 Camaro Convertible Axle-Back exhaust kit are crucial… (See below pics) There are no natural “joints” in the stock exhaust system so it must be cut.
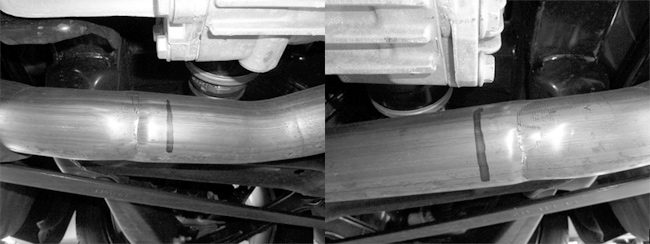
2. The cut line is marked with reference to where the rear differential bottom bolts meet the differential. Mark and cut 90 degrees to the plane of the pipe. A sawzall is recommended.
3. Pull down on the muffler assembly and squirt soapy water into the rear rubber hangers where the metal rods go thru it. You could use penetrating oil but it deteriorates the rubber. Doing this makes it easier to slide the mufflers out of these hangers.
4. By either pulling the mufflers or prying with a large flat screw driver or pry bar, manipulate both mufflers out of the stock rubber hangers.
5. The stock muffler is now disassembled and its time to put your new axle back exhausts kit on.
Installing Your New Exhaust Kit
Note: If you snug everything first instead of fully tightening, it will allow for movement and adjustments once the new system is on. Snug, align, snug some more and then do your final tighten.
Note: The bottom band clamp on the J-pipe’s must be loosened and swiveled down in order to install each tailpipe. Once tailpipe is installed the J-pipe’s can be repositioned.
1. Slide each axle back piece into the rear rubber hanger. Note: Use outside holes. Inside holes are not used.
2. Take mid rubber hangers off the stock hanger rod.
3. Slide each Solo pipe over the stock exhaust pipe.
4. Install mid rubber hangers onto both hanger rods.
5. Manipulate the tail tips into perfect position. The Solo Axle-back exhaust pipes do not need to “bottom out” onto the stock pipes. A small overlap is sufficient. Rear tail tips should be positioned slightly inside (1/4” to 1/2”) the end of the valence.
6. Install the Solo band clamps and snug while someone holds the tail tips in perfect position.
Note: Solo clamps: Hold the top nut with a 9/16” wrench and lightly snug the bottom bolt head with a 9/16 socket. This flat band clamp will form around each layer of pipe.
7. While someone with a good eye holds the tips in place, evenly and slowly tighten the band clamps 50-60 ft lbs or until tight.
8. The J-pipes only come snug from Solo and can be swiveled to fit your car. Swivel the j-pipes into position then tighten all four (4) band clamps to 50 – 60 foot pounds or until tight.
9. Rear braces (3 bolts 1 nut per side 15MM) need to be re-installed.
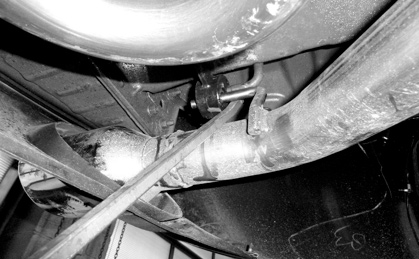
10. To adjust the tips (after band clamps are tight) see the below picture. The tips can be easily “tweaked” toward the outside of the car using the method below. Don’t push too hard as moving them back inward is not as easy.
11. Road test….
12. The j-pipes are at a “factory preset” that is good for most Camaro’s. If you hear any bad RPM ranges or vibrations you can shorten or lengthen the top piece of the j-pipe to “tweak” your car to your liking.
13. To shorten or lengthen the j-pipes just loosen the top clamp and shorten or lengthen the end cap section on both sides.
14. The procedure that we use is:
• Shorten by 1”
• If this makes the sound more desirable move in either direction ½” until fully satisfied.
• If shortening the j-pipe makes it worse, then length if from this position by 2”.
• Move in ½” increments from here until fully satisfied.
15. Drive away and… Enjoy Going Solo!
Back to TopFor any questions or concerns, please do not hesitate to call:
Jeff at (905) 703-1557 or
Mufflerman Buffalo Shop at (716) 873-0440 or
Zoro Muffler Mississauga Shop at (905) 897-6833