Catalog › Installation Guide: Solstice/Sky Header Installation Guide: Solstice/Sky Header
Warnings and Safety Measures
• Allow the vehicle’s exhaust system to cool before removal. Exhaust system temperatures may cause severe burns.
• If working without a lift, always consult vehicle manual for correct lifting specifications.
• Always wear safety glasses and ensure safe work area.
• Catalytic converter are to be used for off road use only.
• Professional installation is recommended.
Some Header Installation Tips
✓ It is very important to have your car cool down completely before starting your install.
✓ The lower gasket will only fit one way. GM’s bolt pattern is irregular.
✓ The stock upper gasket “header to block” is usually good for one “on and off.” If your manifold has been off before you may want to get the proper GM gasket. They are under $20.00 and readily available.
✓ We have made our header flanges extra thick to combat the problem of nuts coming loose.
✓ If you have the stock catalytic converter you must raise the car via hoist or good quality set of ramps. Be careful. Be safe.
✓ If you have an aftermarket cat, this is not necessary. Why the difference? There are three studs on the stock cat that point up. When the nuts are all off, (from the block and at the cat) the manifold is still stuck. You must remove the bottom converter hanger bolt to allow the cat and exhaust to come down a few inches. Support the exhaust system if necessary. Most aftermarket cats don’t have these 3 studs attached and raising the car is not necessary.
Installing Your New Header
1. Raise car if necessary. See installation tips.
2. Remove negative battery cable.
3. Remove plastic shroud above the motor.
4. Remove manifold heat shield and 3 bolts, 10mm. This shield does not go back on. Watch for sharp edges.
5. Unplug the O2 sensor at the connecting end.
6. Remove the oxygen sensor from the manifold using a ⅞ or 22mm wrench. Place in safe spot to protect it.
7. Remove 3 lower manifold to converter nuts, 15mm.
8. Remove bottom converter hanger bolt from underneath the car. This is only if you have a stock cat. See installation tips.
9. Remove 10 “manifold to block” nuts, 13mm.
10. Carefully remove manifold from car.
11. Remove factory gasket from block.
12. Lightly sand (1200 grit) gasket surface on block and converter.
13. Re-install factory gasket on block (or your new GM gaskets.)
14. Install the header to the block and finger tighten the ten nuts. Blue lock tight can be used on the threads.
15. Loosely attach the converter using the gasket provided, to the header.
16. Loosely attach the converter hanger bolt if you had to take it out.
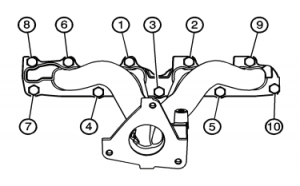
17. Snug the nuts “header to block” as per the attached bolt pattern diagram.
18. Tighten the nuts “header to block” as per the attached bolt pattern diagram.
19. Tighten the 3 nuts and hanger bolt “converter to header.”
20. Re-install the O2 sensor.
21. Plug in the O2 sensor.
22. Replace plastic motor shroud.
23. Replace negative battery cable.
24. Now you’re done!
Back to TopFor any questions or concerns, please do not hesitate to call:
Jeff at (905) 703-1557 or
Zoro Muffler Mississauga Shop at (905) 897-6833