Catalog › Installation Guide: JEEP SRT-8 MACH-XJ3 Installation Guide: JEEP SRT-8 MACH-XJ3
Warnings and Safety Measures
• Allow catalytic converters cool before removing the sensors.
• Hot stainless steel can cause severe burns, please be careful.
• It is extremely important to let your car cool down for several hours before attempting your install. Hot stainless steel can cause severe burns.
Warning: When Working on under or around any vehicle exercise caution. Please allow the vehicle’s exhaust system to cool before removal, as exhaust system temperatures may cause severe burns. If working without a lift, always consult vehicle manual for correct lifting specifications. Always wear safety glasses and ensure safe work area. Serious injury or death could occur if safety measures are not followed.
Removing the Stock Exhaust System
1. The stock exhaust is very heavy so make sure you support the exhaust while removing and don’t let it fall.
2. Remove the 2 nuts at the flange connection at the rear of the converter ( just before the muffler.)
3. Undo the hardware that connects the muffler and tailpipes.
4. Carefully remove the large heavy muffler assembly, and then remove the tailpipe assembly.
NOTE: Removing the hangers from the rubbers can be difficult. It helps to squirt soapy water between the metal rod ( that is attached to the exhaust system )and rubber hanger. This acts as a lubricant and helps with ease of removal. Just pull down on the exhaust system to open the hole where you want to squirt the soapy water.
5. The stock exhaust system is now disassembled and its time to put your new kit on!
Installing Your New SOLO Exhaust System
Note: NOTE: If you snug everything first instead of fully tightening, it will allow for movement and adjustments once the new system is on. Snug, align, snug some more and then do your final tighten.
1. Install your Solo Performance MACH-XJ3 TAILPIPE assembly first. Place the tailpipe assembly over the rear axle. Attach the rear –most hangers at the bumper first. Once the rear hangers are inserted into the rubbers then attach the hangers that are located over the axle.
2. Install your MUFFLER ASSEMBLY. First you slide the “slip” joint together at the back of the muffler. Then you can loosely assemble the nuts and bolts that connect the rear “ball and socket” joint as well as the front “ball and socket” joint. Install the band clamp loosely on the “slip joint” at the rear of the muffler.
3. At this point the cat-back MACH-XJ3 exhaust kit is in place but loose and has some manipulation room.
NOTE: The J-pipes may need to be swiveled into place. They should not touch anything and you must tighten the J-Pipe clamps once they are in their proper place. The J-Pipes come snug but not fully tightened.
4. Line up and lightly snug all connections. Snug lightly enough to allow for movement.
5. Line up the exhaust tips into perfect position having someone with a good eye holding them.
6. Make sure there is clearances all around the pipes and muffler to avoid rattles later on.
7. Evenly snug (do not tighten) all of the connections. Once each connection has been snugged again and the exhaust tips have been checked and are OK then do a light tighten on all the connections. Tighten the bolts evenly so that the system doesn’t “pull.” Check your tips and then do a final tighten.
SOLO clamps: Hold the top nut with a 9/16” wrench and lightly snug the bottom bolt head with a 9/16 socket. This flat band clamp will form around each layer of pipe.
Adjusting The J-Pipes
This should not need to be done on most cars but incase please follow:
If you have an in town “bog” or trouble RPM ranges just undo the top band clamp of the J-Pipe and move in or out ½” . Determining which direction gives the best results and then do further adjustments in ¼” increments. Both J-pipes must be adjusted evenly.
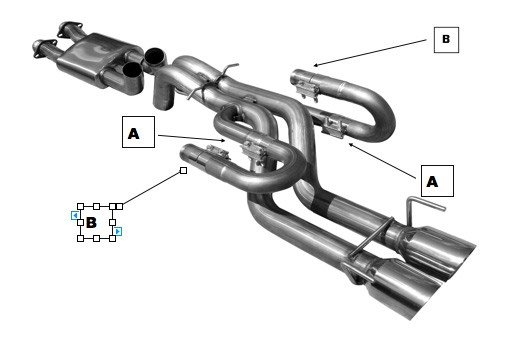
Note: The J-pipes come to you with band clamps on them. The lower band clamps (A) need to be loosened and the J-pipe swiveled into the cavity where the stock muffler was. The J’s are shipped resting on the tailpipe. This position is for shipping only. Once you install the system Clamp A must be loosened and the J-pipe turned away from the tailpipe into the muffler cavity. There is no correct position other than the J can’t be touching anything and it must have clearance from the floor.
Do not adjust any “length” from the Clamp A position.
The upper Clamp B is where you adjust the length if necessary. Most systems are good with the factory preset length but if you need to adjust for trouble RPM ranges you do it with the end cap slider at the Clamp B position.
Please take care with your first few drives. Too often excitement leads to “situations” on the first drives.
Drive away and… Enjoy Going Solo!
Back to TopFor any questions or concerns, please do not hesitate to call:
Jeff at (905)703-1557
Mufflerman (Buffalo NY) at (716) 873-0440
Zoro Muffler Mississauga Shop at (905) 897-6833